Search
RSS

Blog posts of '2015' 'January'

Sweet Strawberry Love

Nothing says I love you like chocolate! If you are looking for a creative way to tell someone you care about them, this might work.
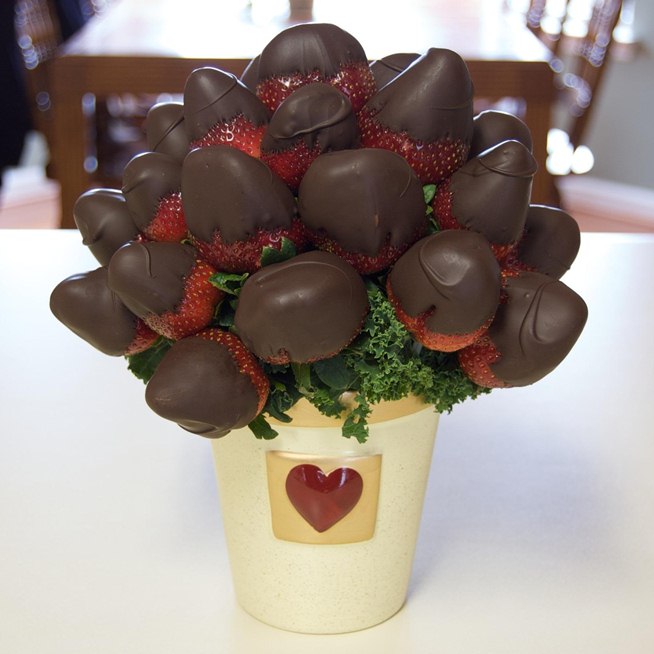
The one you care about will thank you. If they don't like milk chocolate you can melt, white chocolate or dark chocolate.


For this DIY craft you will need:

1. strawberries (12 or more depending on how many you are going to taste test)

2. 12-20 wooden skewers

3. chocolate melting chips (found at  Walmart or your craft store).

4. wax paper

5. medium size sauce pan

6. Vegetable Oil (small amount  (tbs.) added to chocolate if it gets dry)

7. heave vase of your choice (will need to be heaver to support the weight of your 12 or so chocolate treats.)

8. dish towel

9. filling to place between your chocolate strawberries.(kale, green tissue paper)

Wash your strawberries and pat them dry with the dish towel. Use your wooden skewers to

pierce the green leafy end of the strawberry. Follow the directions on the back of the chocolate candy

to melt your chocolate. Dip your strawberries in the chocolate and place on the wax paper to cool. Place your 

strawberries into the fridge until you are ready to deliver.

Feel free to put your own touch on this craft. You may want to roll the chocolate in you friends favorite candy before the chocolate cools.


Rock Garden Markers

Have you ever said, "What's that sprouting up in my garden?"  

I know I have a time or two.

You won't have to wonder once you finish with your Rock Markers. This is a cute and easy DIY craft that you will want to share with all your garden friends. You are going to want to start by collecting a dozen or so medium size smooth rocks. If you cant find the smooth ones any rock big enough to paint and easily pick up would do.


The one to the left is a nice rock but it is too big for this garden craft! The one to the right is the perfect size for our Rock Garden Markers. Once you have found your just right rocks you will want to wash them off in a hot bucket of soapy water.

You might just want to drop the rocks in and let them soak for a few minutes. Be sure to wash all the dirt off. If you don't your paint may come off in that area. 

Now it's time to dry off. A large towel would work best. Wrap your rocks up and pat pat pat! Allow them to dry over night to be sure no dampness remains.

Let the fun begin! Go to your nearest craft store and pick out some fun craft paint that works for outdoor crafts.

You may want to think about what you want on your rocks before you pick out your colors. Once you have your design in place pick out your paint and paint brush. You will want to spread out newspaper on your surface before you begin.

This craft can get a little messy depending on the age group. :)

Ones your art is finished you may want to cover it with a gloss finish. This can be found at your craft store or Lows.

Happy Painting!


Butterfly Feeder

 Are you missing the butterflies in your garden?

With this easy DIY craft you will soon be able to enjoy watching butterflies flutter from flower to flower.

You will need:

1. Mason jar

2. lid

3. small sponge

4. strong string

5. sauce pan

6. sugar

7. bright craft paint

8. garden stickers

9. hammer

10. 1 nail

You will want to start by tapping a small hole through the top of your mason jar lid. Next you will cut off a piece of the kitchen sponge and wedge it into the hole. This is where your butterfly will feed.  Next you will want to test your jar to make sure the liquid does not leak out. For now you can add water and turn the jar upside down to make sure it does not leak. Next you can add the string  that your feeder will hang from. You will need 1 long piece about 6  feet long. this will wrap around your jar near the lid as well as secure the other 2 pieces that will be used to support the sides of the feeder as it sits upside down. Tie the 6 foot string around the ring of the jar so you have an even amount on both sides.

Make sure it is nice and tight. Now you are going to tie 1 end of the 2 foot string to one side of the string wrapped around the jar. Next you are going to tie the opposite end of the 2 foot string to the other side of the jar. This will make a loop over your feeder. Next you want to do the same thing with the other 2 foot string. This time you are going to secure it to the opposite side of where the other 2 foot strings are attached. When you are done you should have 2 secure loops that support the jar evenly on all 4 sides. Now you will need to decorate

your jar so that it will attract the butterflies as well as humming birds. You will want to use bright colors and flower stickers for this.  Finally you will need to make the butterfly food. boil 4 cups water to 1 tablespoon sugar on the stove until sugar is dissolved. Don't use too much sugar it can hurt the butterfly.

Allow time to cool and then add the food to the jar. Secure the lid and hang about 3-4 feet above flowers so the butterflies can flind it. Now its time to sit back and enjoy your new garden friends.