BULK 100 PACK
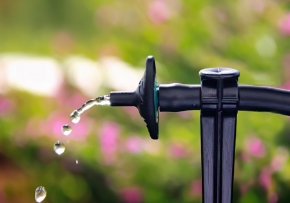
Our Newly Designed Adjustable Dripper Stake is adjustable by turning the Top Dial to water from 0 to 10 GPH. Turn the Top to increase output from a drip up to a 2-ft eight- stream pattern. The Newly Designed Top Dial has a built-in positive "Stop" feature that prevents a cap from blowing off easily if the top is roated too far to the left.
When increasing the water output, you can open the Top Dial until you feel a positive "stop" resistance to know that it is fully open. The Tops can be removed. To do so, once the Top is in the fully open position, simply twist the Top with more force in a "counter clockwise” motion to remove it. To reassemble, use force pushing the Top back on while also turning it in a “clockwise” motion until you feel it catch the threads. In the event you ever lost or needed a Replacement cap, the (MLD-STACAP) can be purchased separately.
Use these Adjustable Dripper Stakes to gently water patio and potted plants, landscapes, or gardens.
Install by running a piece of 1/4-in Vinyl Tubing to the plant from the 1/2-in Poly Tubing using the enclosed 1/4-in Vinyl Barb X Barb Coupler.
Use either of our Hole Punch Tools (MLA-51 or MLA-TOOL) to snap a hole into the 1/2-in Poly Tubing to install the 1/4-in Vinyl Barb X Barb Coupler that is included in the package.
Push the end of the 1/4-in Vinyl Tubing onto the side 1/4-in barbed inlet of the Adjustable Dripper Stake and place near the base of the plant.
If you punch a hole in the wrong place, or want to relocate the Dripper Stake by moving the 1/4-in Coupler, then simply remove the Coupler from the 1/2-in Poly Tubing and snap in one of our Goof Plugs (MLA-51G).
Also use our 1/4-in Tees (MLT-TEE) and Elbows (MLT-ATE) to run the 1/4-in Vinyl Tubing in opposing directions or in tight corners to supply water to these Dripper Stakes.
(3 Stakes/ 3 1/4-in Couplers Per Bag)
(Made in the USA)
Drippers and Drip Tubing should NEVER be buried underground but can be covered lightly with Mulch.
RECOMMENDATIONS & LIMITATIONS
When installing any irrigation system, it is important to be aware of manufacturer recommendations and potential system limitations. Please be aware of the following: Order of installation is critical for proper system function. This is the order in which parts should be installed, starting from an outdoor faucet.
1) Check your outdoor faucet to make sure there is an attached or built-in Brass Anti-Siphon Vacuum Breaker that is designed to prevent the backflow of fluids into the portable/drinking water system.
2) A Metal "Y" Fitting is suggested so you can still attach your garden hose.
3) The Electronic Mister Timer (MLWT-1ZONE, MLWT-TWOZONE), or our Mechanical Timer (MLWT-EGG).
4) Pressure Regulator. When using Drippers, we highly suggest using our 25 PSI Pressure Regulator (MLD-25PR).
5) 150 Filter (MLFF-41) is suggested for Drippers or when using our products with "well" water.
6) 1/2-in Poly Faucet Fitting (MLF-33) to connect the 1/2-in Poly Tubing, or the 1/4-in Faucet Adapter (MLA-FAS) to connect the 1/4-in Vinyl Tubing.
For more information, please download our Installation Guide (PDF) with more information.
MAXIMUM RUNS
1/4-in Vinyl Tubing - Run up to 30 feet of our 1/4-in Vinyl Tubing installing no more than eight 8 Adjustable Dripper Stakes set to just a drip only. Only 5 Dripper Stakes can be used if set to wide open and maximum clicks using 10 GPH and small circle sprays.
1/2-in Poly Tubing - Run up to 300 feet of our 1/2-in Poly Tubing installing up to 30 of the Adjustable Dripper Stakes that are wide open to 10 gph with a small stream spray or run up to 300 feet of our 1/2-in Poly Tubing installing up to 100 of the Adjustable Dripper Stakes with the top open to only use up to 2 gph with water dripping at 25 PSI at the faucet.
Minimum operating pressure for Adjustable Drippers: 5 PSI for Dripping
Maximum operating pressure for Adjustable Drippers: 50 PSI for Spraying 8 Streams