Search
RSS

Blog posts tagged with '#diy'

Potted Garden

 You don't need a lot of land to have a garden. Pots are a great way to grow all your favorite fruits and vegetables.

The pots allow you to grow your vegetables anywhere. You can keep the plants out of reach for animals. Weeding will also be a little easier. If you are one who has a bad back you might want to place the pots on a table that is waist high. This allows you to water and weed without putting the strain on your back.

Placing your fruits and vegetables in a pot is great If you live in an area where the ground is not not garden friendly. For more potted garden ideas go to Google and punch in "potted garden".


Creative Garden Story

Gardens can say a lot about who you are. This spring I am going to build a garden that tells a story about my life. I am going to include DIY created pieces of art. I don't have everything planned out yet but, I know it will all come together with time. My DIY art will tell a story that express the personality of my 2 children, my husband, and our dog.

One of the art projects  will include a toy truck and blocks. My 1 year old son Justice loves to run his trucks all over the furniture while grunting and making funny sounds. The blocks will remind me every day of how much he loves to climb and explore. 

My daughters Abigale who is 2 will have her spot in my garden as well. I have a few creative ideas I want to use to express who my daughter is. They include a dog and books because she loves to carry around her favorite pink dog. The book remind me of how much she loves to read.

I am undecided on what I will do for my husband. I thought about placing a kitchen plate  in the garden to remind me that he does a great job washing the dishes after dinner. I also want to place something Navy to represent the time he served.

Fedor our 5 year old English Bulldog is getting a old chewed up boot with a cactus planted in it. The chewed up boot is to remind me to pick up the kids toys at night so he does not eat them. The sharp cactus in the boot is to keep him from taking the boot from the garden. He loves to chew!

My plan is in place and now it is time to figure out what materials I can use that will look good in my garden and be weather friendly.  I look forward to sharing my garden story with you this Spring!


Mister Landscaper's DIY Kits

Mister Landscaper has many great Kits for all your low-flow irrigation needs.

All the DIY Mister Landscaper Kits have everything you need to set up your low-flow irrigation system. Below you will find a list of all the kits and what they can do for you.

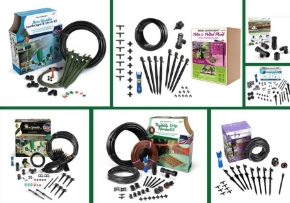
1.  Micro Sprinkler Beginner's Kit with 2 Green Stake Assemblies covering up to 150 sq. ft.

2. Micro Sprinkler Landscape & Shrub Kit with 5 tan Stake Assemblies covering up to 250 sq. ft. (Each kit sold individually.)

3. Micro-Sprinkler Landscape & Shrub Kit with 5 Green Stake Assemblies covering up to 250 sq. ft. (Each kit sold individually.)

4. The Mister Landscaper 50-foot Micro Sprinkler Starter Kit - Everything you need to water up to 275 sq. ft. of landscape, gardens, shrubs, trees, vegetables, and more is found in this all-in-one kit.

5. After many requests, Mister Landscaper has developed a kit with the sole purpose of making it easier to expand your existing Mister Landscaper irrigation system.

6. Vegetable Garden Drip Irrigation Kit covering up to 100' of vegetable rows. (Each kit sold individually)

7. Patio & Potted Plant Drip Watering Kit will drip up to 8 plants or spray up to 3 plants.

8. You will never have to add water to your bird bath again! The Birdbath Dripper Kit is an incredible way to refill your bird bath with a simple addition to your Drip Irrigation System.

If you want to know more about one of these great DIY low-flow irrigation kits visit www.misterlandscaper.com.

DIY Easy Raised Garden Bed

Raised garden beds are getting very popular for many reasons. Some of us have bad dirt and want to start over. Others want to keep small animals out of the garden. Then there are those of us who just like the look. No matter what you reason is for wanting a raised garden bed. I have a few easy solutions to building one that will take very little time and effort and money.

The first idea is to use an old plastic swimming pool. You can cut most of the bottom out so the water can drain and place a bottom layer or rock prior to filling it up with dirt.

The next idea is to use a horse trough. They are easy to find at tractor supply and they look good. If you don't like the color you can always paint the outside. Don't forget to cut the large hole in the bottom and dump a layer of rock before you put the dirt in.

My third idea was to find a old wooden box. The ones people use That ship large items. They may be a little too tall but, you can cut as much as you want off the top. It would still be easier than starting from scratch.

My last idea was to use an old sand box. It does not matter what kind. My daughter has an old plastic one that liked like a crab. I wish we still had it. The last step is to plant your raised bed and enjoy the extra time and money you saved.

Please feel free to share your DIY project on our Mister Landscaper Facebook page.

Recycled Coffee Can

Recycled Coffee Can

Don't throw out the empty coffee can. It will make a great flower pot. In a few easy steps I will tell you how to turn your empty coffee can into a beautiful flower pot.

1. Rinse the can out with plain water.

2. carefully poke about 5 Skittle candy size holes in the bottom of the plastic or metal can.

3. Paint your entire coffee can with paint recommended to be used on plastic or metal. The darker the paint the less coats you will need to cover the advertisement on the coffee can.  Let the paint dry for about 1 hour.

4. Now you are ready to stencil your flower pot. You can make your own stencils with peel and stick contact paper and a sharp knife.www.youtube.com/watch. This Youtube video will show you the details.

5. If you don't want to make your own stencils you can pick some up from any craft store.

6. Once the flower pot is dry about 1-2  hours you can now place about 1 inch of rocks in the bottom add your soil and a plant of your choice.

I hope you have enjoyed this craft and we look forward to hearing from you on facebook.