Search
RSS

Blog posts tagged with '#gardenchat'

Baking Soda In The Garden

Dear garden friends,

Baking Soda is our friend in the garden as well as in the kitchen. Baking Soda can be used in the garden for many different reasons. If you want to keep the pest away from your plants, rejuvenate your roes bush, sweeten your tomatoes, and more. Next time you are making your grocery list add another box of Baking Soda for your garden. 

Baking Soda

How to keep the pest away:

If you are having a problem with pest you can sprinkel Baking Soda around the garden. Don't sprinkle it directly on your plants. This will help discourage rabbits, roaches, silverfish ants and more.


How to rejuvinate your roses:

1 tsp. Baking Soda

1/2 tsp. clear ammonia

1 tsp. Epsom Salt

1 gallon water

(This mixture will treat about 4 rose bushes that need a pick me up.)

Spray


How to make sweeter tomatos:

Sprinkel Baking Soda near your established plants to make a sweeter tomato.

Tomato

Check out Mister Landscaper Pintrest page for more great DIY garden ideas.


Happy Planting!


Straw Bale Garden

Have you ever wondered if soil is the only way to grow a garden? Believe it or not you have other options. Today I am going to share with you how to create your own Straw Bale Garden.
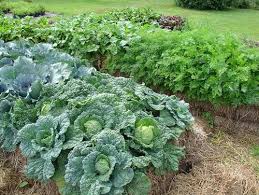
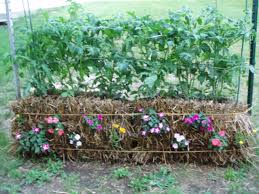
 

Straw Bail Garden's are  great for planting in small areas or areas that don't  have soil. You will need to prep your Straw Bale Garden. The good news is that it will only take 12-14 days to prepare.

The great news is that if you use Mister Landscaper's DIY Irrigation you won't have to worry about most of the prep work. The first move is to purchase your straw bales and liquid fertilizer, with nitrogen to to increase the decomposition process. The total process takes 10-12 days. 

Before you set up your Mister Landscaper DIY Irrigation Kit you want to make sure your straw bale is on it's side with the cut side up. The cut side of the straw bale will act like little straws. This allows the water and fertilizer to soak down into the bale.  Now you are ready to set up Mister Landscaper's DIY Low-Flow Irrigation Kit. This only takes about 20 minutes or less. 

If you order  Mister Landscaper's Timer you can attach it to the end of your hose and you won't  have to water your bales for the next 3-4 days. You will want to set the timer to water often so that it remains damp for the entire three days. On the third day you will start using the liquid fertilizer. For the next 7-8 days you will want to use the liquid fertilizer. in addition to watering.

On day 12 you will want to return to just watering your bale. On the 12 day you will be able to stick your hand down into the bale and feel the heat from the decomposing process.

You don't want to plant until that tempature reaches the same temperature as the outside air.
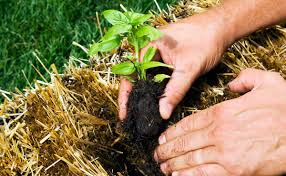
If you plant too soon you will cook your plants. On the TH day you will need to start using the liquid fertilizer. Once the temparture reaches the air temperature it's time to plant.

You can plant anything in your Straw Bale Garden although some plants can pose a challenge. For example, corn and tomatoes grow tall and may cause your bale to tip.
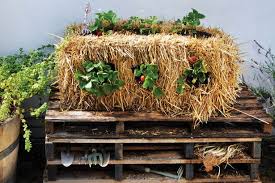
Potatoes grow down and it may be difficult to retrieve them. To plant you will plant the same way you plant in the soil. You want to dig out a hole as deep as your plants root.

Be sure to space your plants according to the directions on the plant. Add some soil around the plant to stabiles it then place the straw you removed from the hole on top of that..


Finally you are ready to sit back and watch your plants grow. Don't forget to fertilize the plants once every week or two. Mister Landscaper's DIY Irrigation will take care of the watering.


How to Grow Garlic


Did you know that there are over 450 different strands of garlic? I was excited when I heard the news! It made me start to wonder, "What garlic am I getting in the little jar at my local super market,

Maybe I am missing out on something better?". With a little more research I found that you can go online and order some of the different types of  garlic bulbs and plant them in your own back yard.

garlic is not complicated to plant  and the time to plant is November. After watching a YouTube video I learned how easy planting garlic can be. The video I watched was planting garlic in a raised garden bed.

I learned that it's best to use string to section off your garden into 1 square foot sections. It looks like a over sized checker board. Next you want to peel open the garlic bulb and separate each clove.

You want each clove to be planted about 5-6  inches apart. You will have 4 cloves in each square foot.  The clove will have a little green stem pointing out of one end. This is the side you want  to plant up facing the sun.

The bulbs need to be planted under 2  inches of soil. This will help protect the bulbs during the winter months.

If you live in a very cold climate area  you will want to place some mulch on top of your garlic bed prior to the first hard freeze to  help protect them. By next spring -summer you will be enjoying fresh garlic out of your garden. The greatest part is that you won' have to go to the supermarket to make your next garlic dish.


Growing Pumpkins


As a child I always remember that special time of year spent with my family going to the Fall Festival and picking out the Just Right pumpkin.I must of been a pickey kid because it always took me the longest. I wanted my pumpkin to be perfectly rounded on both sides and the brightest orange out of all the other pumpkins. The best part of the whole experience was getting it home and carving it. I vividely recall the cold, wet, slimey feeling when reaching into my pumpkin to pull out all the guts and seeds.  My dad and brother would help set up a make shif table in our driveway so we had a place to sit our pumpkins as we carved.

The next step was to decide what we wanted our pumpkin to be. This was a challenge. We did not own the best carving tools. Mom would pick up the pumpkin carving kit from the local grocery store. The knife and paper pattern was not easy to work with. We would work for what seemed to be hours carving out our master piece.

Once we were finished we gathered up all our guts and seeds and placed them into a big plastic bowl. I always remember it being dark before we were finished which was perfect because we could light our candels and place them into our pumpkins to display our master pieces for everyone to see when they walked up our long and narrow sidewalk. After a few minutes of gauking at our master pieces and deciding whose was the best we would go into the house and begin the process of seperating the pumpkin seeds from the pumpkin guts. This was a lonf and stickey process. We would lay out newspapers on the kitchen table and place the big plastic bowl in the center. Once we wre finally done we would take half the seeds and spred them out on a cookie sheet to go into the oven.

We liked salt so we were sure to sprinkel  a lot of salt all over the seeds before we put them into the oven. The other half of the seeds we let sit over night and in the morning we would take a small metal kitchen spoon into the back yard and dig little holes placing two-four seeds in each hole. We did not know much about gardening but it worked. The following summer we had mounds of pumpkins growing in our back yard!  It was very exciting to watch them grow every day out our back picture window.

Cake Pan Stepping Stone

 Don't settle for the same old stepping stones you find at your local hardware store.

Make it your own by adding your personal touch. Is all you need is a  cake pan, contact paper, ready mix concrete, rubber gloves, Vaseline, chicken wire, sponge, bucket, varnish and your personal selection of marbles, glass, rocks and anything else you might like to add. You can also make new pieces by breaking up old china or glass.

Be sure to use protective gloves and eye ware before you start hammering.   Now you will need to rub the inside of your cake pan down with Vaseline to prevent the cement from sticking.

Next you cut out the contact paper into the shape and size of your cake pan. Place the contact paper in the bottom of the cake pan with the sticky side up. Place your rocks, glass and marbles onto the contact paper face down creating your own personal design. Now you are ready to mix your concrete. find an old bucket and pour enough concrete into the bucket to fill your cake pan.

Next you need to slowly add water and stir the concrete with a long spoon until it is the consistency of cake batter.

Do not get the concrete on your skin. If it does get on your skin wash it off right away. If you leave it on your skin it will start to burn. Fill the cement to the top of the cake pan. Now place a square or circle piece of chicken wire into the cement and press it about half way down.

Don't cut the wire too big or it will be sticking out the sides of your stepping stone.


Allow the cement to harden then you are ready to remove your personal stepping stone.

You can use a sponge to clean your stone and use the extra cement to fill in any air bubbles. Finally you can varnish your stone to keep it nice and shiny.

Garden Signs


Are you looking for a way to spice up your garden this summer? What about creating your own personal sign. It can be very simple and does not have to cost a lot. I found almost everything I needed in my barn.

If you have some old 2x4s, paint, nails and a hammer you are set. Now depending on what you decide to paint you may want some letter stencilers or a nicer tint of paint than what you have in the barn.

If you need some ideas check out a garden magazine find something you like and put your personal touch on it. Maybe you can stenciled your last name on one of the 2x4s and then add a flower or two.

The options are endless. If you don't like how it turns out let that paint dry and try something new later. 


Growing Organic Tomatoes


Grow Tomatoes Organically
 
1. You will need a place with at least 5 hours of sun.
 
2. Work up the soil and add compost or rotten manure.
 
3. Tomatoes love to eat! Add about ½ dozen egg shells to the soil as well (this adds calcium to help prevent rot)
 
4. You can buy or grow you tomato plants. When picking your plants don’t buy a big plant that is growing in a small container. Also avoid tall tomato plants. These plants tend to be root bound.
 
5. Tomatoes don’t like frost! Wait till the frost season is over.
 
6. To plant tomatoes dig a deep hole or long trench. Loosen roots as you remove the seedling from the pot.
 
7. Plant the tomato plant deep. You want about 3-4 inches of the plant above ground.
 
8. You will want to put up a trellis to support the tomato plants. As the plant grows you can tie it to the trellis with a soft cloth.
 
9. If you don’t want to bother with a trellis you can let them spread out on the ground. Just be sure to give them lots of room so they don’t rot.
 
10. Tomatoes need water! They need about an inch or water a week. Don’t give them too much water because this can cause rot. If you are looking for a great way to water your tomatoes check out Mister Landscapers DIY low-flow Drip irrigation kits. They work great when you want to save water and give your plants the perfect amount. Check them out at www.misterlandscaper.com
 
11. Don’t let the weeds tale over
 
12. Enjoy your home grown tomatoes!