Search
RSS

Blog

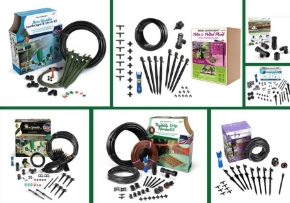
Micro Sprinkler Beginner's Kit

Mister Landscaper has everything you need to set you up with a easy DIY low-flow irrigation system.  

The Micro Sprinkler Beginner's Kit is a great place to start.

It provides you with easy step-by-step instructions that will allow you to sit back  within 30-45 min. later and sip your favorite drink while all your flowers are being watered.

The Micro Sprinkler Beginner's Kit comes with 2 Green Stake Assemblies and covers up to 150 sq. ft. The instructions are very clear and easy to follow. You will be done after 6 easy steps. Each step includes a photo that demonstrates what you need to do next. 

Once you have set up your low-flow irrigation system you can sit back and enjoy  all the benefits. The low-flow irrigation system  from Mister Landscaper will have you using up to 50% less water.  It will save you time that you would have spent watering  your plants by hand, and you  will save money on your next water bill.

The Micro Sprinkler Beginner's kit makes a great Christmas gift for all your garden friends. The great thing about Mister Landscapers kits is that if you ever want to add on to the system it is very easy. Mister Landscaper sells everything sold in the kit individually as well. You can go back and re- order at any time, and as long as you spend $25.00 or more the shipping is free. 

If you would like to place an order today for Mister Landscaper you can go to www.misterlandscaper.com

Thank you for taking the time to read my blog. If you have any questions please feel free to ask.


Pumpkins are Great

Growing up I always thought pumpkins were only good for carving during Halloween.

As time goes on I am finding out that you can use pumpkins for a lot of reasons.

You can make a pie,  bake the seeds, plant flowers in them, use the shell as a drink dispenser use them for the head of a scare crow, and paint them. The list keeps growing.

Pumpkins are great for many reasons.

The pumpkin it's self is also good for you. Pumpkins are a great source of vitamins and minerals.

They have beta-carotene, potassium, and vitamin C. Pumpkin can also help prevent hardening of the arteries.

Next time you go to the pumpkin patch or local super market you might want to pick up a pumpkin for one of these great reasons.

Mister Landscaper want's to wish all of you a wonderful week.


Canning

Don't let all those fruits and vegetables go to waist. You can can them easier than you think. 

Simply follow the step by step instructions and you will be eating your own canned fruits and vegetables all winter long.

1. The first thing you need is the fruits or vegetables. Be sure to throw out or cut off all the rotten pieces. Next you want to wash them really good to remove dirt and chemicals.

2. The temp you use for canning depends on the type of food you want to can. If it's vegetables the temp. must be 240 F till all the harmful bacteria is destroyed. This can be done with a steam pressure canner.

3. If you are canning fruit (tomatoes included) they have a high level of acid and require heat processing of 212 F. This is reached by using a boiling-water canner.

4. It is important that you use the most up to date guide lines for canning your fruits and vegetables. Be sure that the cook book is newer and double check the canning process with an additional up to date source before you begin. If you go to the Ball or Kerr web site you will get the most up to date canning instructions.

5. When you are ready to fill your jars with the hot content be sure you leave extra space at the top of the jar. Use a wooden spoon to help get all the air out of the hot food. Push the spoon down the inside of the jar all the way around and carefully push the food down. This should get most of the air out.

6. Next, clean the rim of the jar with a clean damp cloth. Place the warm heated lid on top of the jar. Now you can screw the band down nice and tight. It does not have to be really tight. You should be able to get it off using only your finger tips.

7. Now you can carefully remove the jars from the canner and place them on a counter to cool. You might want to put a towel down first. Do not tighten the loads more at this point. Just let the jars cool.

8. Wait 24 hours or more before checking the lids to make sure they sealed. You can check by pushing down on the center cap. If it does not move it is sealed. If it does move this meant the jar did not seal and you will need to refrigerate it and eat it first.

9. The last step is to labile date and store for later. 

10. You are done and ready to enjoy your fruits and vegetables all winter long.


Fall DIY Placemats

Are you looking for something neat to place on your kitchen table for the holidays?

How about DIY placemats?

you will need:

1. fresh leaves

2. crayons

3. photos

4. lamination paper (see link below)

5. scissors

They are the perfect decoration for the fall season. It is an easy DIY craft that does not have to take a long time to make and you can add what ever you like.

My idea for the up coming season is to use the leaves that are falling from the trees. You can pick any color you wish.

If you can't find the color you want you can use white printer paper and a color crayon. Just place the leaf bumpy side up under the paper and color the paper with your choice of color in a quick back and fourth motion. You will see the pattern of the leaf starting to show through.

With this you can choose any color for your placemat.

Once you have it colored and cut out place it on half of the sticky lamination paper just how you like it. If you want to use the real leaf then just stick it on the paper directly.

If you want to make it personal you can add family photos.

Below I have attached links to where you can find the self lamination paper. 

 http://www.amazon.com/Avery-Self-Adhesive-Laminating-Sheets-73601/dp/B00007E7D2

Thank you for reading our blog. Have a wonderful fall season. Please feel free to share your experience on the mister landscaper Facebook page.

http://www.staples.com/Duck-Clear-Laminate-18-inch-x-8-Yards/product_825000


DIY Easy Raised Garden Bed

Raised garden beds are getting very popular for many reasons. Some of us have bad dirt and want to start over. Others want to keep small animals out of the garden. Then there are those of us who just like the look. No matter what you reason is for wanting a raised garden bed. I have a few easy solutions to building one that will take very little time and effort and money.

The first idea is to use an old plastic swimming pool. You can cut most of the bottom out so the water can drain and place a bottom layer or rock prior to filling it up with dirt.

The next idea is to use a horse trough. They are easy to find at tractor supply and they look good. If you don't like the color you can always paint the outside. Don't forget to cut the large hole in the bottom and dump a layer of rock before you put the dirt in.

My third idea was to find a old wooden box. The ones people use That ship large items. They may be a little too tall but, you can cut as much as you want off the top. It would still be easier than starting from scratch.

My last idea was to use an old sand box. It does not matter what kind. My daughter has an old plastic one that liked like a crab. I wish we still had it. The last step is to plant your raised bed and enjoy the extra time and money you saved.

Please feel free to share your DIY project on our Mister Landscaper Facebook page.

Scarecrow

Scarecrows

Is there something missing in your garden? Do you have a problem with birds?

Have you thought about building a scare crow? They make neat decorations and serve a purpose. It's also a great way to have some quality family time. is all you need is as followed.

 1. long sleeve shirt

2. pants or overalls

3. suspenders 

4. pumpkin

5. i bail of straw

6. old shoes

7. hat

8. stuff that makes noise in the wind

9. marker

10. something to prop Mr. or Mrs. scare crow up on.

Now you are ready to start stuffing. I usually start with the pants. Once you get the panths as stuffed as you wish set the pants aside and start stuffing the shirt. If you want a button up shirt I recommend stuffing a long sleeve plain shirt and then putting the button up shirt on over.

If you try to stuff a button up shirt you will run into a problem with keeping the buttons on. In other words you will start to bust at the seams. 

Once all is stuffed you can tie the top and bottom together with string or you can use suspenders. 

Now decide how you want your scarecrows face to look. You can carve a pumpkin face or just draw a pumpkin face using a black or brown permanent marker.

The last step is to place the scarecrow just how you want it and then add the boots, hat, and tin pans or cans to make noise in the wind to scare off the birds. 

The final step is to name your scare crow.

Enjoy your DIY fall scarecrow!

Please share with us on our Facebook page. We would love to hear all about your scarecrows.


If you are wondering what kind of scare crow to make you can go to http://www.makescarecrows.com/scarecrow-ideas.html for some neat ideas.

If you want so see some ideas you can also go to https://www.google.com/webhp?source=search_app#hl=en&q=scarecrow+pictures&revid=218479491&sa=X&ei=WT9cUM21LOfW0gHMiYGQCQ&sqi=2&ved=0CJkBENUCKAE&bav=on.2,or.r_gc.r_pw.r_qf.&fp=78f29d23f70e5505&biw=1920&bih=989


Pumpkin Carving Ready?

Pumpkin Carving Ready?

We are not too far away and I  am sure that I am not the only one thinking about what I am going to carve into my pumpkins. I have seen a few good ideas I just am not too sure if  I can do what they did. If you are looking for some cute ideas.

For those of you who don't like to get messy but still want the experience I found a online pumpkin carving site. Go to www.onlinepumpkincarving.com.  It's cute and easy to do.

If you see up you can start all over again with the click of a button.

For my friends who love to dig in and try new things I found a site that will allow you to download and print 2012 patterns for free. You have 6 to pick from.

Go to www.spookmaster.com/pumpkin-carving-patterns-freebies.htm.

If you are looking for the perfect pumpkin carving set check out Amazon.com. They are being sold for $6.54 and if you order $25.00 or more worth of stuff you can get the free shipping.

For my friends who have never carved a pumpkin and this will be your first time you can print out step by step directions on www.dltk-holidays.com/Halloween/mpatterns.htm.

For my friends who want to carve pumpkins for the fall season I ran into a cute idea on www.pintrest.com. They were using cookie cutters to stamp out different patterns. If you go to www.pintrest and join for free you can do a search for pumpkin carving and see all the great ideas.

Don't forget to share all your pumpkin ideas with us on Facebook. We would love to hear from you.

Recycled Coffee Can

Recycled Coffee Can

Don't throw out the empty coffee can. It will make a great flower pot. In a few easy steps I will tell you how to turn your empty coffee can into a beautiful flower pot.

1. Rinse the can out with plain water.

2. carefully poke about 5 Skittle candy size holes in the bottom of the plastic or metal can.

3. Paint your entire coffee can with paint recommended to be used on plastic or metal. The darker the paint the less coats you will need to cover the advertisement on the coffee can.  Let the paint dry for about 1 hour.

4. Now you are ready to stencil your flower pot. You can make your own stencils with peel and stick contact paper and a sharp knife.www.youtube.com/watch. This Youtube video will show you the details.

5. If you don't want to make your own stencils you can pick some up from any craft store.

6. Once the flower pot is dry about 1-2  hours you can now place about 1 inch of rocks in the bottom add your soil and a plant of your choice.

I hope you have enjoyed this craft and we look forward to hearing from you on facebook.


Kits to Get you Started

Watering your plants can become  challenging at times.

For me remembering to water my plants can be a challenge. I have had one too many experiences where I just got too busy to stop and water all my plants one-by-one. By the time my life slowed down enough to water all my plants half of them were dead.

This is one reason Mister Landscaper created the Kits. The  low-flow irrigation kits are designed to make your life a little easier. The kits comes with step-by-step directions that are designed to make the process of instillation quick and easy. The Mister Landscaper kits come with everything you will need to water your plants.

Each Kit covers a certain amount of square feet or a certain number of potted plants. Mister Landscaper has also posted how to instructions on YouTube.  If you are a visual learner then the YouTube video's may be very helpful.

Once you get your kit installed and flowing you may want to order additional drippers, or stakes. Don't worry. Mister Landscaper sells the irrigation kit materials separately as well. If you don't have enough of something you can order more. Don't forget shipping is free on orders $25.00 or more.

Don't forget to share your experience with us on the Mister Landscaper Facebook page.

Fall Flowers

Fall Flowers

A new season is around the corner and it's about time to select what fall flowers you want to have in your garden.

In this blog you will hear about 5 of the best fall flowers.

Russian sage

Russian sage is a great fall flower. It will grow tall and bloom small beautiful blue/purple flowers.

The leaves on this flower are small and have a silver tint to them. This flower gets 3-5 feet tall and 2.5-3 feet wide. This flower will need to go in behind your shorter plants. The Russian sage blooms in the middle of summer into fall. It has a beautiful smell and is a great color for the fall season.

Helenium

The Helenium provides your garden with an array of deep reds and a dark brown center, perfect for the fall season. It will grow about 1.25m tall and .6m wide. The flower looks great next to ornamental grass and other earth color flowers. The bees and butterflies will flock to this flower. The Helenium also makes a great fall centerpiece for the up coming holidays. These flowers like a lot of sun and moist soil.

 Mums

Another great flower for the fall is a Mum. They come in many beautiful fall colors and are easy to care for. Mums look great along sidewalks or next to your front door. If you have them in a pot be sure the pot can drain, and give them a good amount of sun and water every day. If they are in the soil you should water them at least 3 times a week. Mums are sturdy flowers with many great colors to choose from. They should last through the fall months and into early winter. If you take care of your Mums they will last for years.

Sunflowers

The sunflower is perfect for the fall season with its large yellow bloom. The sunflower is also great for snacking. I like sunflower seeds with salt. The sunflower is a strong plant but may need support once it gets tall. The weight of the bloom can cause the plant to bend.

Alstroemeria

These beautiful fall flowers come in shades of yellow and orange. The plant grows to be 2-3 foot tall. You want to plant them about 1 foot apart. These flowers like full sun and a well drained soil. They also need to be pruned. This  
allows a new fresh istroemeria to come in.
 
Mister Landscaper wants to wish you a joyful fall season with plenty of fall blooms. If you are looking for fresh new  fall planting ideas check out the Mister Landscaper page on www.pintrest.com for some great new fall ideas.