


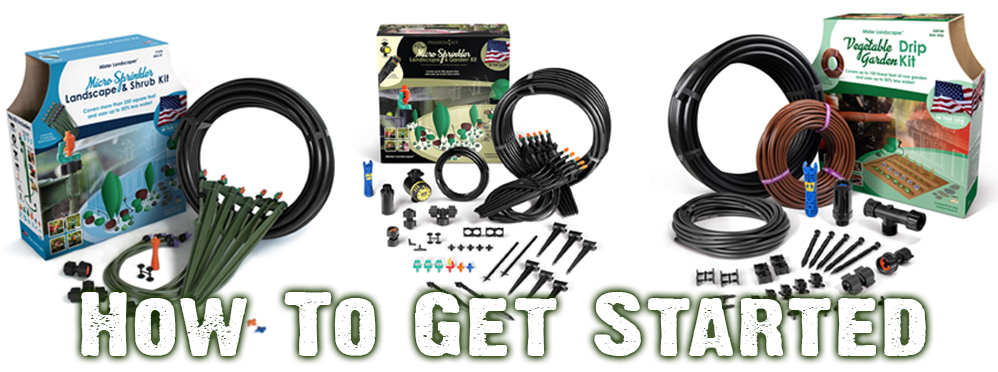
How to Get Started
It’s easy to see why switching from high-volume to low-volume irrigation is a smart move. But why choose Mister Landscaper for your irrigation needs? We specialize in providing top-quality drip irrigation kits and micro spray sprinkler kits, designed for ease of use and maximum efficiency. Our extensive selection of drip irrigation system supplies ensures that you have all the necessary components to customize a system that fits your garden's specific requirements. Additionally, our micro spray system products offer versatile solutions that can be adapted to various landscaping needs, ensuring precise water application and reducing waste. Whether you need a micro irrigation timer, dripper hose, or more, we take pride in offering simplicity, efficiency, and effectiveness to your gardening projects. Making the switch to micro spray and drip irrigation isn't just easy, it's also highly beneficial!
CLICK THE LINKS BELOW TO FIND OUT HOW EASY IT IS TO GET STARTED WITH MISTER LANDSCAPER.
-

It’s Simple
-

Drip Irrigation or Micro Sprays
-

Getting Started
-

How to Retrofit a PVC System
Switching to Drip Irrigation or Micro Spray is So Simple
Switching from high-volume to low-volume irrigation is a smart move for your garden.
Mister Landscaper specializes in high-quality drip irrigation kits and micro spray sprinkler kits.
Our kits are designed for ease of use and maximum efficiency.
We offer an extensive selection of drip irrigation system supplies, allowing you to customize your system to meet your garden's specific needs.
Our micro spray system products provide versatile solutions adaptable to various landscaping requirements.
These systems ensure precise water application, reducing water waste.
We prioritize simplicity, efficiency, and effectiveness in all our irrigation solutions.
Switching to micro spray and drip irrigation is easy and highly beneficial for your garden.
MISTER LANDSCAPER LOW-VOLUME IRRIGATION USES UP TO 80% LESS WATER THAN TRADITIONAL IRRIGATION!

Connects to any outdoor faucet

Requires no gluing

Requires no digging

Installation is fast

Flexible and expandable

Parts are reusable

Commercial-grade materials

Success and experience

Exempt from most watering restrictions
Drip Irrigation or Micro sprays
Getting started with Mister Landscaper is simple, whether you choose drip irrigation, micro sprays, or a combination of both.
All that's required is an outdoor water faucet and less than an hour of your time.
There are key differences between drip irrigation and micro sprays that are important to know for designing the best system.
Below are the advantages and potential disadvantages of each method.
Drip Irrigation Pros and Cons
Drip Irrigation Pros
Drippers tend to have a lower profile compared to micro sprays. They are not as conspicuous in the landscaping.
On average, a dripper uses only 1-2 gallons of water per hour. That is less than a micro spray.
Drippers can be used where some micro sprays cannot, as in the case of smaller potted plants and hanging baskets.
Drippers can be more efficient at watering individual plants.
Drip Irrigation Cons
Because by design drippers emit such a small amount of water, it can be difficult to see or know when a dripper is clogged. In some cases a plant may go into wilt or die before a problem is detected.
Drippers are not as easily unclogged as micro sprays.
Because they emit less water, an increased number of drippers are potentially needed to cover the same amount of area as a single micro spray. This could lead to increased installation time and cost.
Micro Spray Irrigation Pros and Cons
Micro Spray Pros
Micro sprays are significantly more adjustable than drippers, from size and shape of spray pattern to gallons per hour used.
A single micro spray can easily cover multiple plants, while a dripper is much more limited in scope.
Because micro spray patterns are clearly visible, detecting a clog or a problem with the line is much easier.
Clogged micro sprays and flow controllers are easily cleaned for simple, hassle-free maintenance.
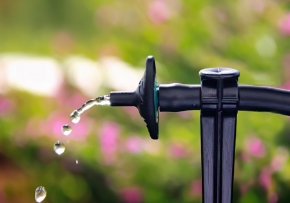
Micro sprays can cool plants and efficiently water them at the same time.
Micro Spray Cons
Micro sprays have a larger profile and may be more visible in the landscape.
Micro sprays are not ideal for certain applications, like small potted plants and hanging baskets.
Soil Type Considerations
One thing to consider when choosing between drip irrigation and micro spray irrigation is soil type. Some soils are better suited for drippers, and some soils are better suited for micro sprays. Here is a simple jar test to help determine your soil type. Begin by taking a soil sample from the area you wish to irrigate. Take that dirt and fill a glass jar approximately halfway (Fig. A). Now fill the jar the rest of the way with water (Fig. B). Finally, place the lid and shake the jar well (Fig. C).
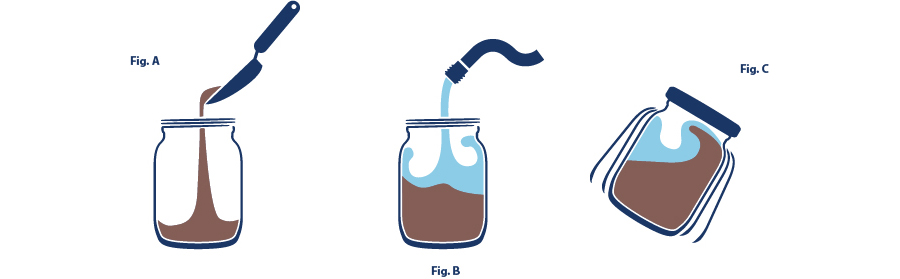
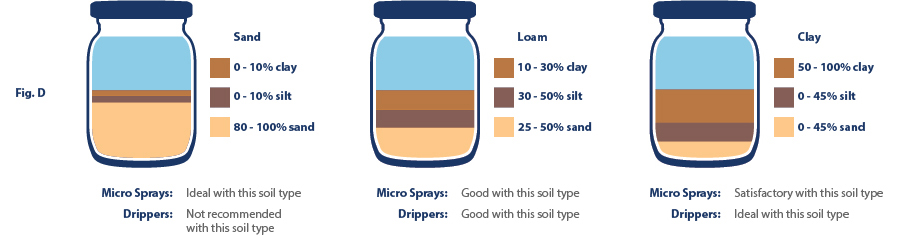
Now let the jar rest for 24 hours. Once the soil settles, the results can be classified in one of three ways: sand, loam, or clay. Use the chart below (Fig. D) to help determine your soil type and which kind of irrigation might be best for your situation. Note: Contact your local county extension agency for best watering practices in your area.
Application
Clearly, there are some applications where one type is more suitable than the other. But, there are a number of applications where either is perfectly acceptable. At the end of the day, it’s all about creativity. Know and understand the benefits of each micro spray and dripper and design a system that works for you and your garden or landscape.
Micro Sprays
With micro sprays, one of the big advantages is coverage. With a single starter kit (MLK-81) you can cover up to 250 square feet! But within that coverage there is a lot of flexibility, especially in the way of spray pattern selection. Some of the micro sprays are great for large and small area general purpose watering. But there are several micro sprays designed with specific purposes in mind (Fig. E).

Note the various options and their potential uses.


Drippers
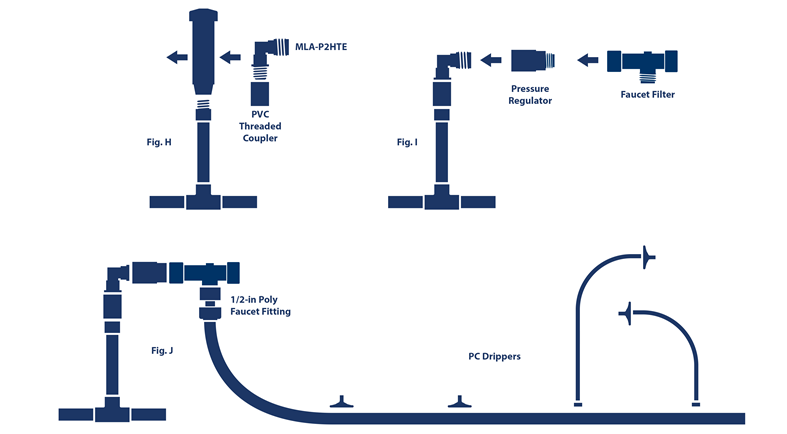
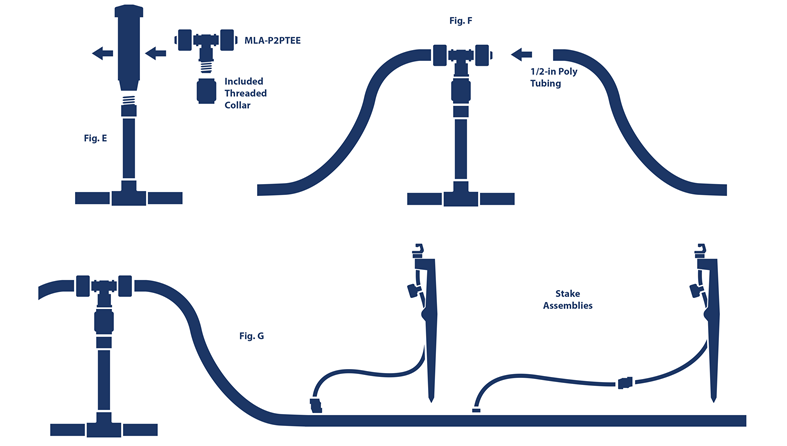
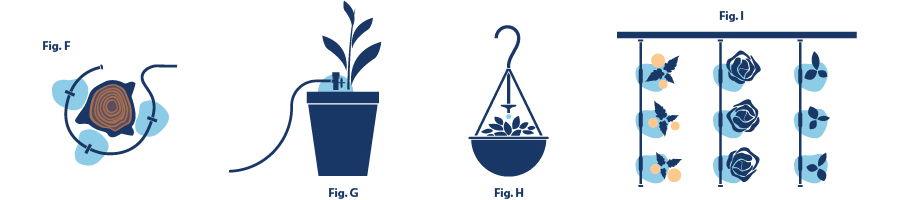
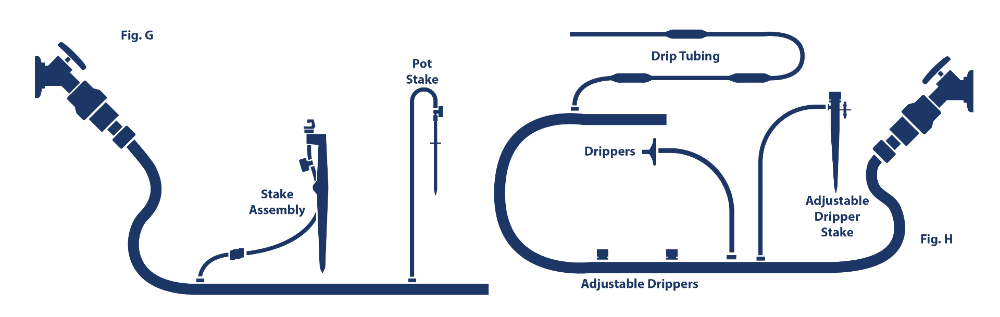
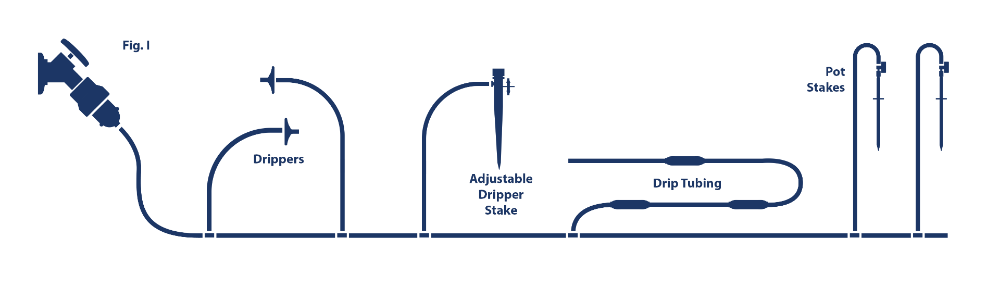
Drippers tend to be a bit more specialized. Use them in places where a micro spray may be overkill or where you prefer a lower profile. Mister Landscaper Add-A-Drippers (MLD-AAD) are perfect for creating tree rings (Fig. F). Adjustable dripper stakes (MLD-STA) are excellent for potted plants of all sizes (Fig. G). PC (pressure compensating) drippers (MLD-.5PC, MLD-PC1, MLD-2PC) are great for hanging baskets and general use (Fig. H). And drip tubing works well in row gardens (Fig. I).

Whatever your irrigation needs, Mister Landscaper is sure to have a solution. And help is always just a phone call or email away (863-439-3200, Email Mister Landscaper)
Getting Started
Which Kit to get Started with:
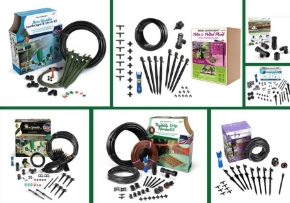
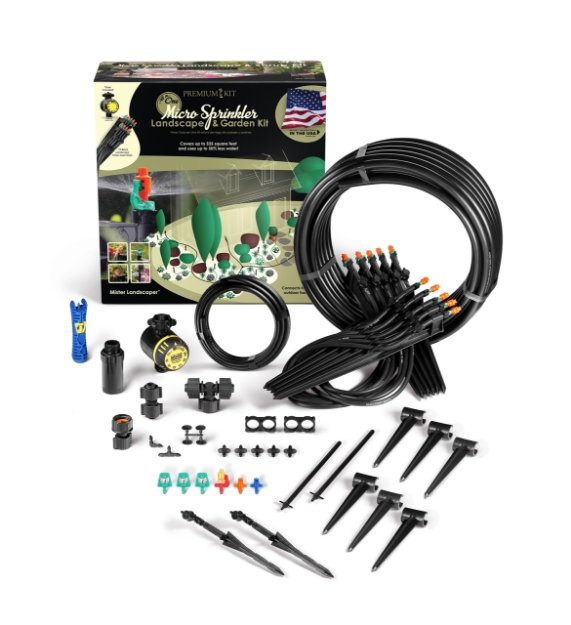
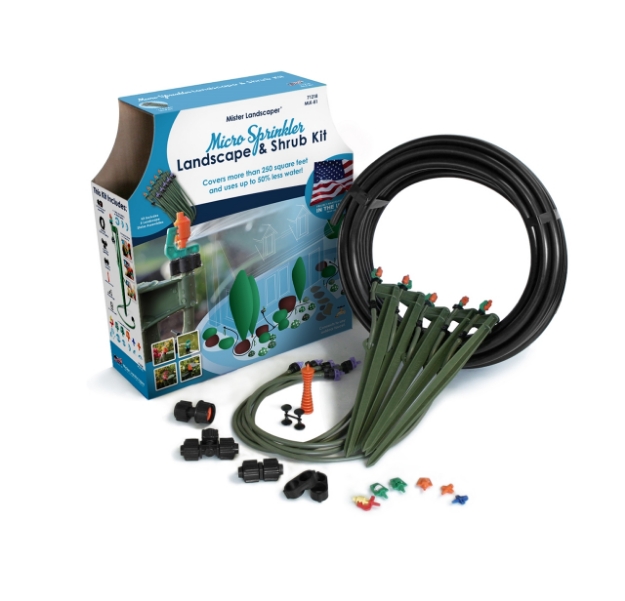
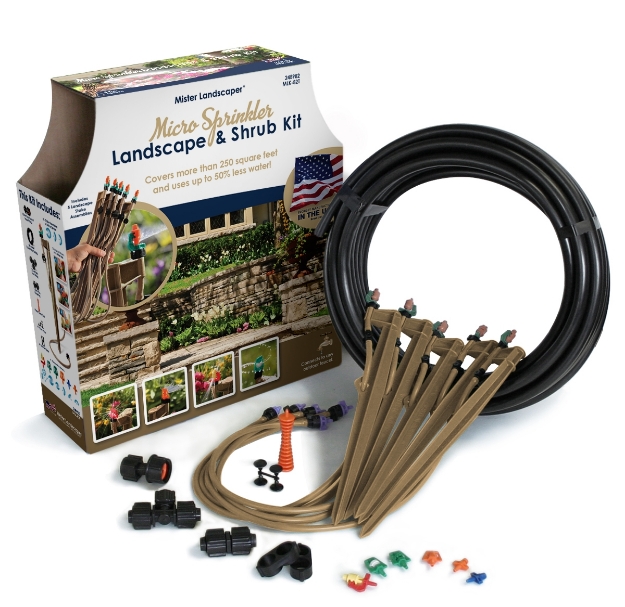
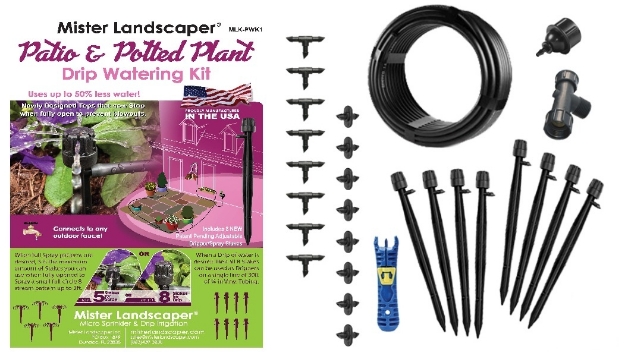
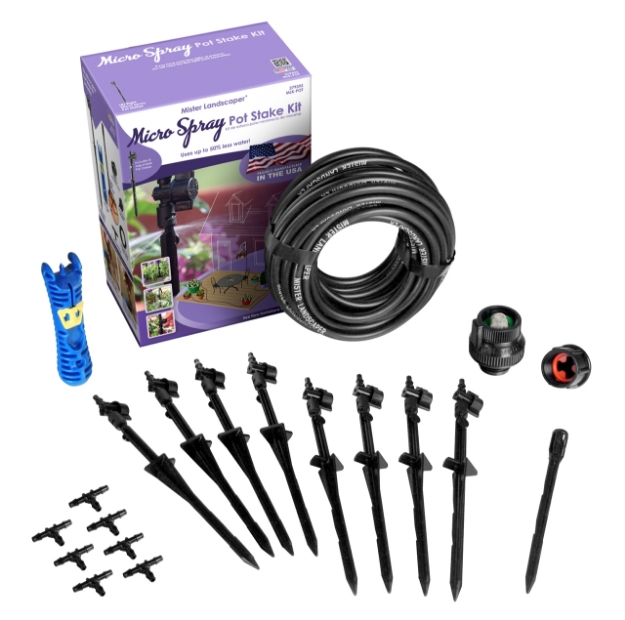
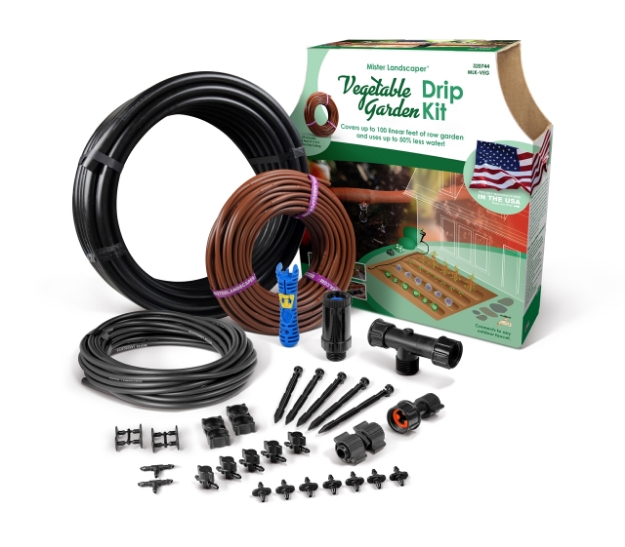
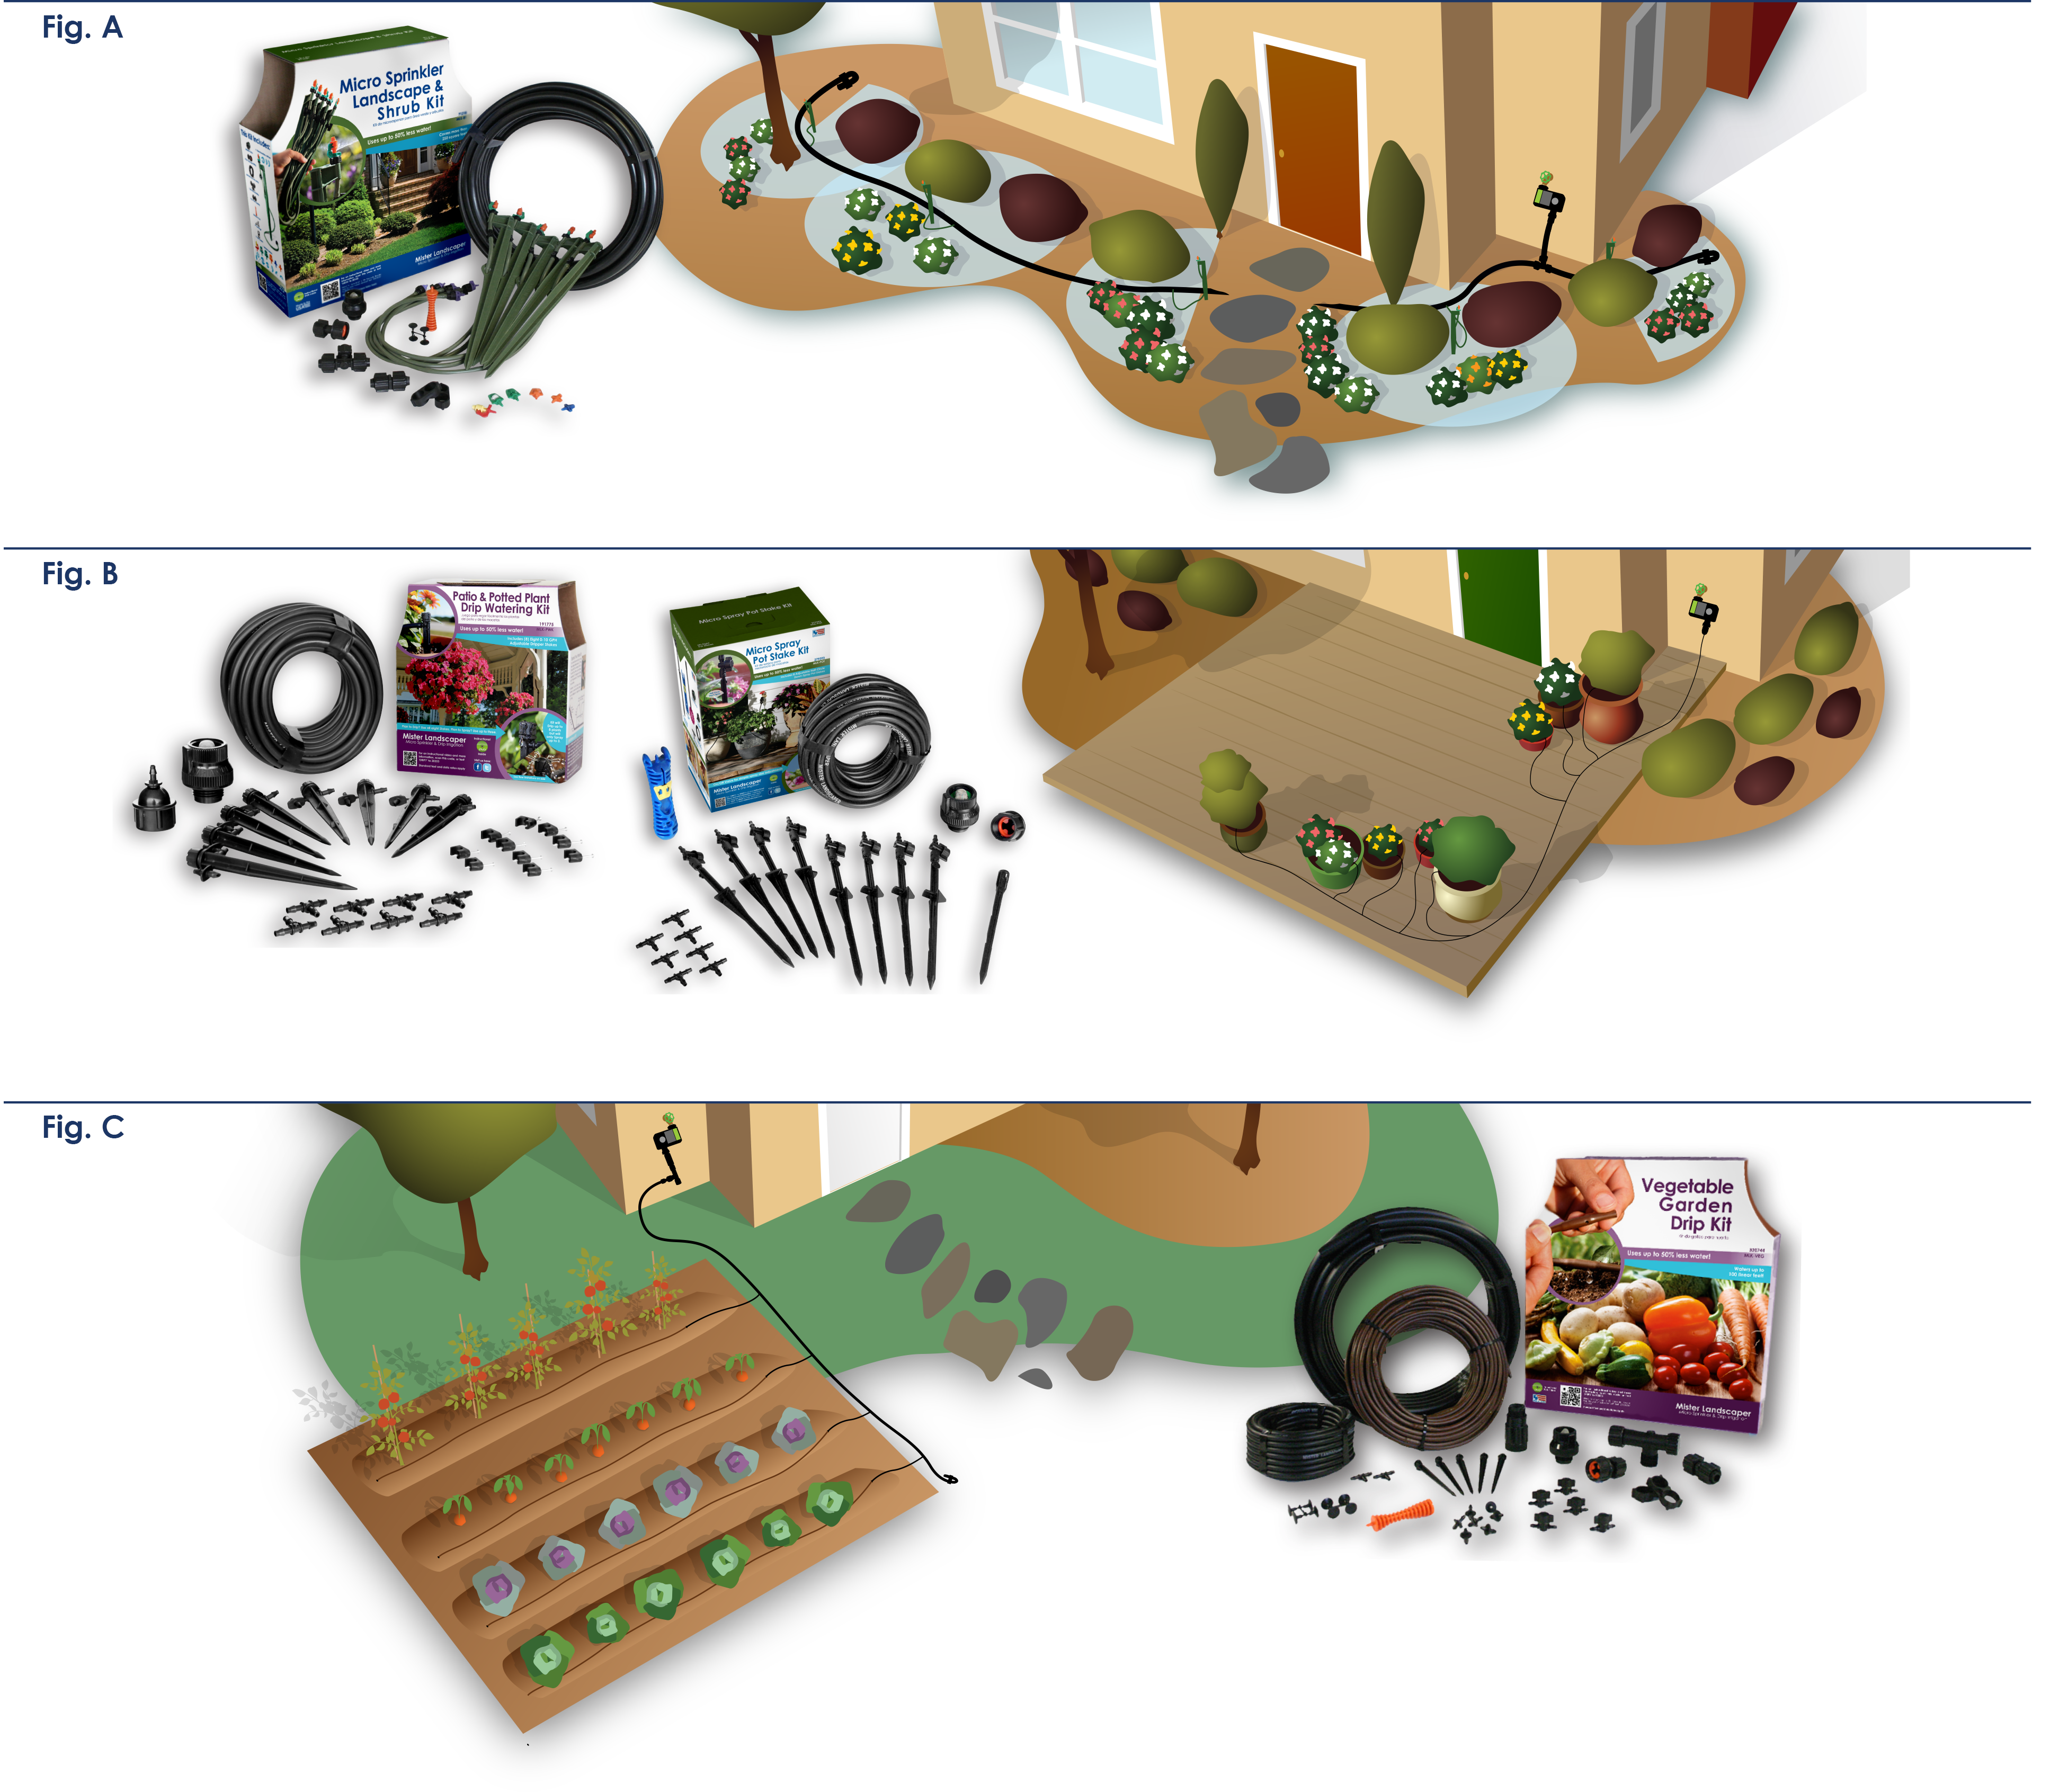
By far, the easiest way to get started with Mister Landscaper is by installing a kit. Whether you have landscape flowers, patio plants, or a row garden, there is a kit to help you get going. For Large Flower Beds or Landscapes use our Premium All-in-One Kit available with Black Stakes (MLK-ALLN1) with Mechanical Timer, or our Premium All-In-One Kit (MLK-ALLN1NT) with No Timer, and covers up to 535 square feet. The Micro Sprinkler Landscape & Shrub Kit, available with Green Stakes (MLK-81) or Tan Stakes (MLK-82T), covers up to 250 square feet of landscape and garden area (Fig. A). Your patio plants can benefit from micro spray or drip irrigation with one of the kits designed for potted plants: The Patio & Potted Plant Drip Watering Kit (MLK-PWK1) or the Micro Spray Pot Stake Kit (MLK-POT) (Fig. B). And row gardens are easily irrigated utilizing the 1/4-in in-line drip tubing found in the Vegetable Garden Drip Kit (MLK-VEG) (Fig. C). But don’t stop there. Most kits are expandable, and they really are just the beginning!
Starting From Scratch
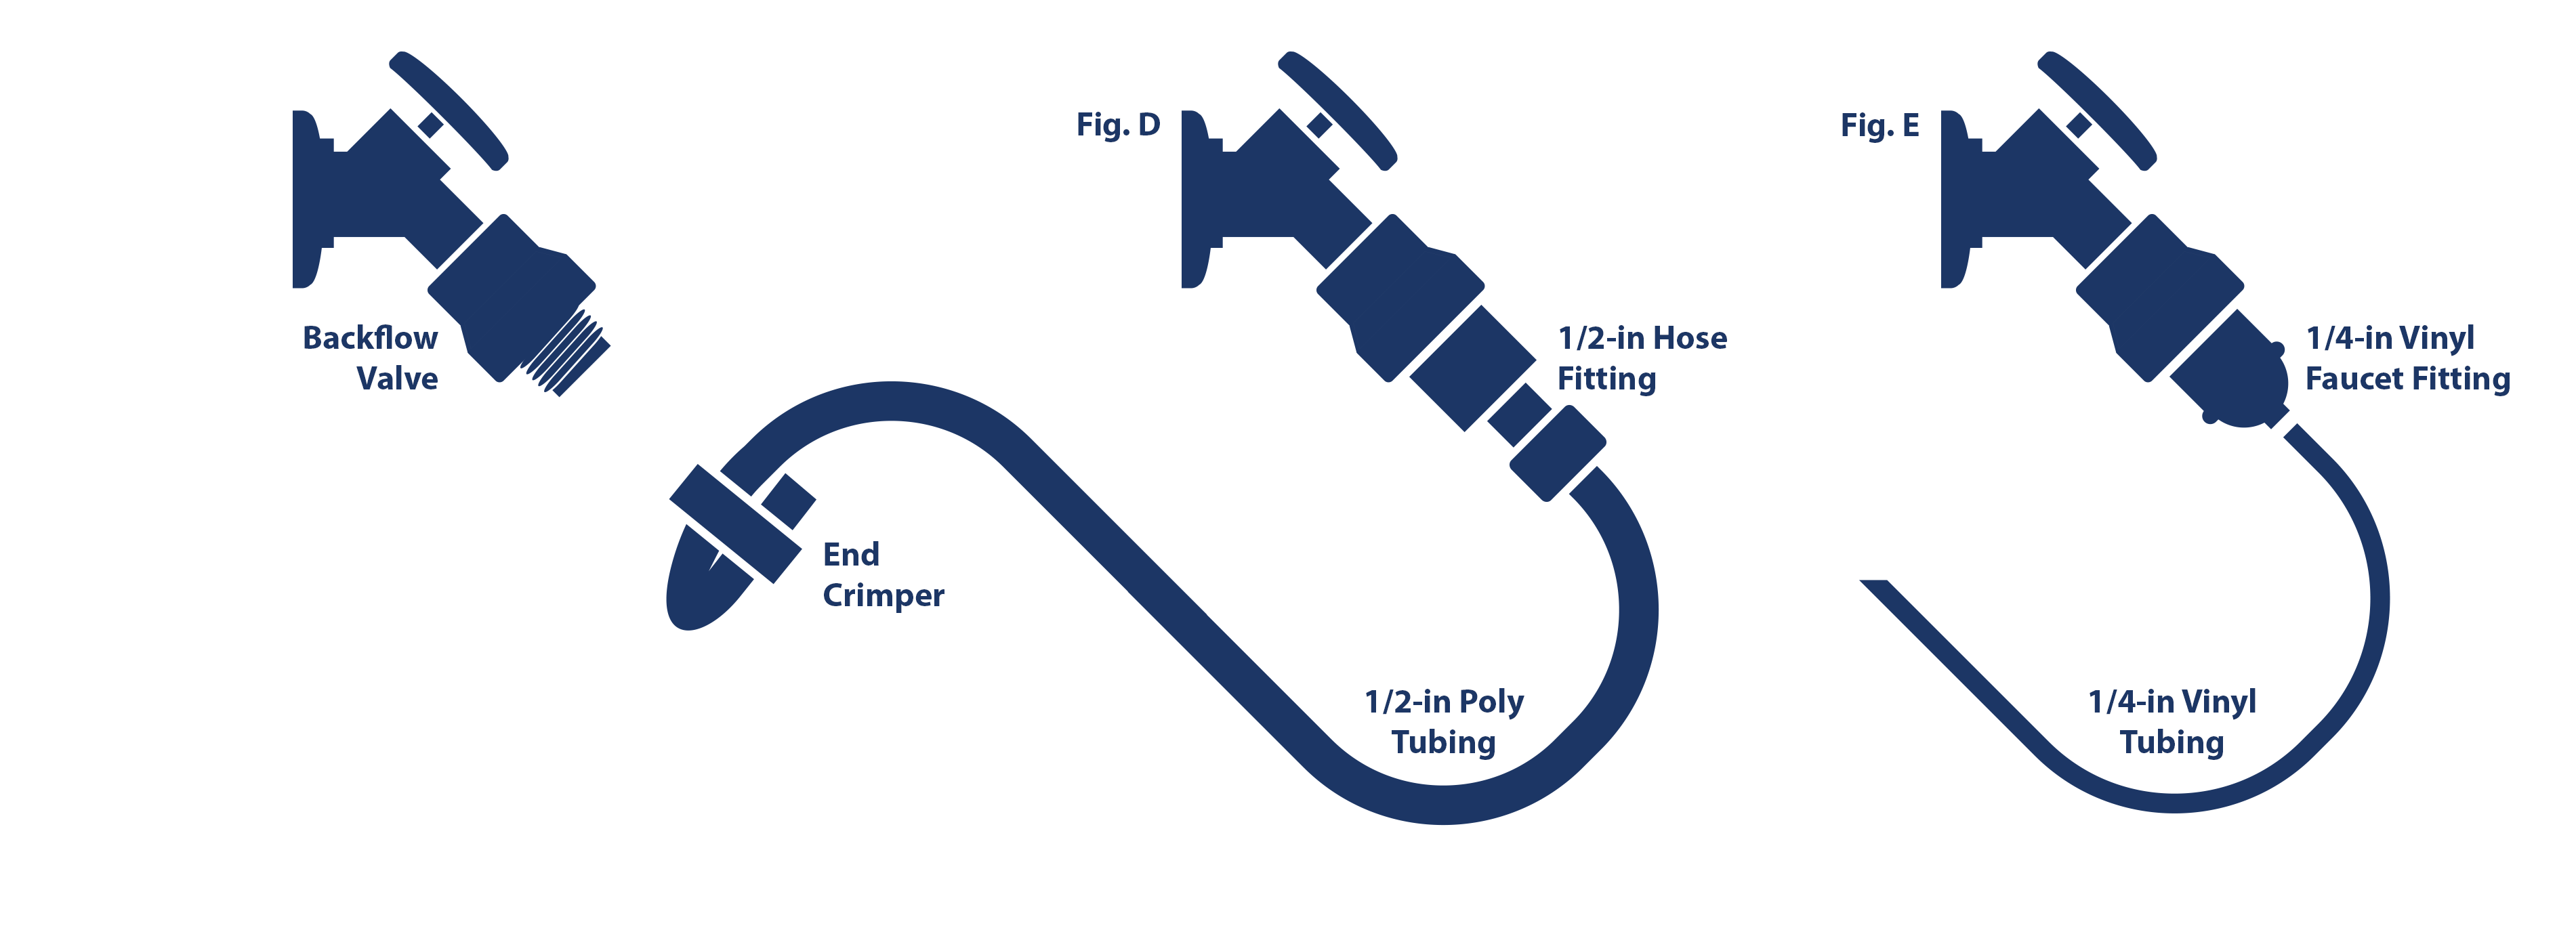
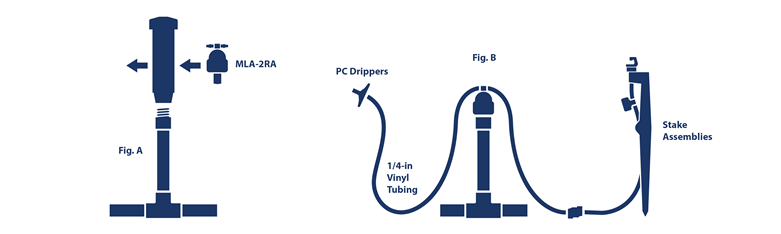
Of course, if you are the adventurous type, here are the basics for getting started without a kit: Begin with attaching to your existing outdoor faucet that has a built in Anti-Siphon device or to a brass backflow prevention valve attached to your faucet with our 1/2-in Poly Faucet. Next install a 1/2-in Poly Faucet Fitting (MLF-33) for use with 1/2-in poly tubing (MLT-71) or (MLT-72) (Fig. E), or a 1/4-in Vinyl Faucet Adapter (MLA-FAS) for use with 1/4-in vinyl tubing (MLT-B30) (Fig. E). From there, use 1/2-in poly fittings (MLF-34, MLF-35, MLF-36) and/or 1/4-in vinyl fittings (MLT-ATE) to customize the layout of your system. Finally, end a 1/2-in poly line with an End Crimper (MLA-50) (Fig. D)
*Refer to our Maximum Run section for how many of these items you can run using 1/2" Poly Tubing
With 1/4" Vinyl Tubing as the main line you can run Drippers, Adjustable Dripper/Stakes, 1/4" In-Line Drip Tubing and Pot Stakes (Fig H)
*Refer to our Maximum Run section for how many of these items you can run using 1/4" Vinyl Tubing
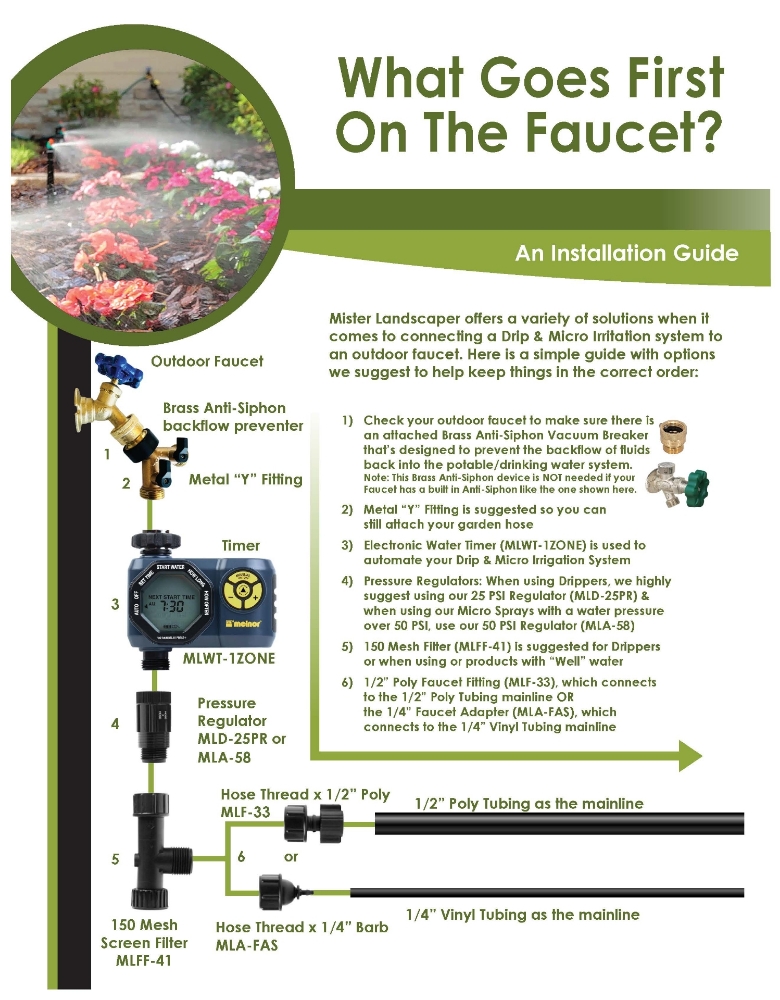
Regulators, Filters, and Timers
We highly recommend the use of our Pressure Regulator (MLD-25PR) and Faucet Filter (MLFF-41) when installing drip irrigation. And for automatic watering, we recommend our Timers (MLWT-1ZONE, MLWT-TWOZONE). Sometimes, when a number of accessories are used, the order of installation can be confusing. Here’s a quick guide to help:
INSTALL IN THIS ORDER:
1) Check your outdoor faucet to make sure there is an attached or built-in Brass Anti-Siphon Vacuum Breaker that's designed to prevent the backflow of fluids back into the potable/drinking water system.
2) Metal "Y" Fitting is suggested so you can still attach your garden hose.
3) Electronic Mister Timer (MLWT-1ZONE), (MLWT-TWOZONE), or (MLWT-EGG)
4) Pressure Regulator: When using our Micro Sprays with a water pressure over 50 PSI, use our 40 PSI Regulator (MLA-40PR) and when using Drippers, we highly suggest using our 25 PSI Regulator (MLD-25PR)
5) 150 Mesh Faucet Filter (MLFF-41) is suggested for Drippers or when using our products with "well" water.
6) 1/2-in Poly Faucet Fitting (MLF-33), which connects to 1/2-in Poly Tubing OR the 1/4-in Faucet Adapter (MLA-FAS), which connects to 1/4-in Vinyl Tubing.
For more information click on the link below:
What Goes First on the Faucet
Connecting to PVC
If you currently have an underground PVC system and would like to use Mister Landscaper with that system, go to How to Retrofit a PVC System.
How to Retrofit a PVC System
Even if you have an existing high-volume PVC system in place, Mister Landscaper has made it easy to convert to low-volume irrigation. There are two basic ways to retrofit your system. Option one allows you to replace a single sprinkler head with a sprinkler converter. With this option, you are swapping one sprinkler for up to nine micro sprays or drippers. In option two, a single sprinkler head is replaced by a system converter. With this option, you are swapping one sprinkler for an entire micro spray or drip irrigation system. Here’s how it works:
Option One: Sprinkler Converters
Select the appropriate adapter—From one to four outlets (Fig. A)—and replace your existing high-volume irrigation head with drippers or micro sprays (Fig. B).
One of our unique adapters is the MLA-SPR1. The MLA-SPR1 actually works in conjunction with a high-volume sprinkler head. This adapter allows a single 1/4-in line to be run from a PVC riser where a high-volume sprinkler head is also being used (Fig. D).

Option Two: System Converters
Select the appropriate adapter. Replace the existing sprinkler head (Fig. E), then connect 1/2-in poly tubing (Fig. F) Now run micro sprays through your landscape or garden (Fig. G).